Making games with Construct 2: GOTY 2013 – SNAKE

///
10 mins read

Let’s start with a tip for future game designers; start small. Your first game will not be an MMORPG to outclass World of Warcraft. You might not even be able to make a workable Super Mario Bros. clone. But even eliminating those options, there are still tonnes of simple game ideas to choose as your first. So let me give another tip to those designers;
Why SNAKE? Because the game utilises the basics of game engines and game design. The player moves faster through the use of a formula, collisions must be handled for the game to function, and there is emphasis the states of a game. It is a solid test for both testing game-making suites and custom game engines. For the reasons listed above, this is the first game I plan make using Construct 2.
The game design of SNAKE is fairly easy to grasp for anyone who has played it or its clones. The player starts as a one-block-by-one-block head. By eating the fruit that is randomly placed in the playing field, the player increases his/her speed and also gains an extra body segment. If the head of the player either runs into one of the walls or another body segment, the current game ends and the player is sent back to the title screen.
There are four main game objects to this design; the player head, the body segment, the wall, and the fruit. Everything else that could be considered an element of the game (IE the title screen, scores, etc.) are all secondary to these four objects. I start with designing the player head, arguably the most important object in the game. What I have found in creating SNAKE with other tools is that it is usually easier to have many aspects of the design to be controlled from the player head, as many functions of the game directly affect the head. So that is my first goal; creating the player’s head.
I go into the objects menu and create a sprite. (For those uninitiated, Construct 2 calls its game objects ‘Sprites’ despite the fact that sprites are well-defined as images and nothing more.) After contesting with my lack of drawing skills, I had four images that resembled a red box with eyes. These would serve as the indicators for which direction the player was headed in. I then began to work on the timing formula which would indicate when the head and body parts could move to their next position.
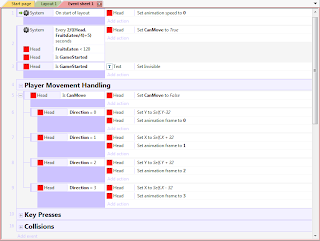
Construct 2 has an unusual way of programming. Although I’m not extremely well-versed in the system, all of the programming is represented in what Construct 2 calls an ‘Event Sheet’. In this event sheet, users can create events that can have multiple conditions to trigger and multiple actions that the event triggers. From what I can tell, this event sheet is the only “File” where the programming code is placed. If you’re more familiar with traditional and statement-based programming it is a bit jarring to transition to this event-based system, but it is manageable.
Ignoring a brief moment of confusion and an expressionless face, I am easily able to dive into the event sheet and produce an event that allows for a switch to be triggered that tells the player head game object when it can jump to its next position. Of course, I had to trick the ‘Update Every X Seconds’ command and input a formula dictating how fast that updating should occur, but it achieved the desired results.
A brief and successful test later I am now onto creating the events which tell the player head to jump to a relative position based on a variable. This was fairly easy, but I was snagged by a slight problem; there are no clearly-defined IF statements in Construct 2. In programming, IF statements lock specific code behind a variable-checking gate. If the variable check comes out as positive, then the locked code is executed. If negative, then that code is skipped over. It did take me a few minutes, but by adding a sub-event to a simple variable-checking event you can achieve the same type of effect as a traditional  IF statement.
With my movement and player head updating formula completed, I began working on the walls. The reason I decided to do this was because I always like establishing a definite and working playing field of a game before testing whether anything else goes wrong. (AKA, I like keeping my problems in a box.) Using the trusty paint-bucket drawing tool, I created a grey wall sprite that would work lovely with my snake head.
Or so I thought.
The first issue I ran into with my grey walls was placing them around the level. Originally a 32-by-32 sprite, my wall did not fit like a glove on the sides of an 800-by-600 layout sheet. (a ‘Layout Sheet’ is the area in which a game takes place.) I originally just started to copy and paste more versions of the grey wall, but upon realising that I would have to continue to place dozens and dozens of those little walls and line them up exactly for collision detection purposes, I became very ill and decided the only cure was a traditional programming loop.
Surprise surprise, Construct 2 doesn’t have any programming loops. In traditional and statement-based programming, loops continuously perform an action until a certain variable value is met. They are very useful for overriding the manual labor of tedious and repetitive programming, which would solve my issue of placing the walls in my SNAKE clone. But as Construct 2 doesn’t have any loops, I would have to suffer the manual labor of individually placing all those tiny grey walls. Frustrated, I took several dozen minutes before I came up with what I thought would be an alternative and workable solution to my wall problem; stretching the wall object.

This did not work either. For some reason, stretching a game object in the layout only stretches the collision box to a certain extent. This limit does not cover the whole object if the object is stretched to a very large size, such as more than 20 times its original width and/or height. Due to encountering another faux-solution, I decided to just change the walls to two different game objects that would have appropriate collision boxes based on their individual sprites. This finally gave a workable solution to me problem and I was thrilled.

However, in-between all of this fiddling in creating a working wall, I noticed a glitch with the player head; if the player does a half-circle of keystrokes, they can end up moving in the opposite direction that they were previously traveling in. This is very bad as since the as-of-yet-to-be-implement body segments will be following the player head from behind, the player could accidentally hit a combination of keys that would make them do a 180 and lose instantly from hitting a body segment without any warning. Puzzled with this new problem and still slightly frustrated from my adventure in getting a wall to act like a wall, I decided to end there and be done with my game this week.
Come back next week to (hopefully) see the end of the making of this SNAKE clone and actually play a semi-finished project created with Construct 2.

This is the bio under which all legacy DigitallyDownloaded.net articles are published (as in the 12,000-odd, before we moved to the new Website and platform). This is not a member of the DDNet Team. Please see the article's text for byline attribution.

Previous Story

Review: Draw Slasher (Vita)

Next Story

Review: Tetris Axis (3DS)

Latest Articles

>